

Gutenberg is a new age WordPress editor which is designed in such a manner that it can be easily integrated with the WordPress core. It is slated to be released with WordPress 5.0 by the end of this year. It is expected that Gutenberg will change the whole scenario of the WordPress editor and give it a whole new dimension which was never thought of before.
In Gutenberg, everything is a block and therefore, in order to work proficiently with this exceptional editor you need to have an idea of how to deal with a block. For those who don’t know, a block is a unique way of organizing your content in a simplified manner which previously required a lot of effort from the user side.
Now is the near perfect time to prepare your WordPress website for Gutenberg. Taking that aspect into consideration, today we’re going to explore the art of creating a custom block in Gutenberg. Although Gutenberg provides you with many ready to use blocks, there are some situations where you need to create a custom block in order to provide a specific feature.
In this article, we will create a customized block in my-custom- block plugin to display a random image using the PlaceIMG web service. Through this live example, you will able to understand the functioning of a custom block in a better way.
Before going into the details of a custom block, you need to have an idea of block scripts and styles. Only after knowing that aspect, you can deal with the registerBlockType() function by which you can create a block in Gutenberg. So, let’s explore that aspect first.
Enqueueing Block Scripts and Styles
To design a block, you need to incorporate CSS & JavaScript into Gutenberg. For that purpose, WordPress provides us with two new methods for Gutenberg:
1) enqueue_block_editor_assets
2) enqueue_block_assets
Remember that these methods be available to you only if you’ve installed the Gutenberg plugin in your WordPress. Both the methods work very similarly to a typical WordPress hook for the enqueueing scripts. The only difference is that these methods are specifically intended for working with Gutenberg blocks.
The enqueue_block_editor_assets is used for adding the script and styles to admin editor. Therefore, you can use it for the enqueueing JavaScript to register blocks and CSS to style UI elements of a block.
As far as the block output is concerned, you’ll want the block to render the same in an editor as it does on the front-end. For that purpose, enqueue_block_assets comes into the picture as it allows you to set add the style to both editor & front-end automatically. You can also load the JavaScript with this method if required.
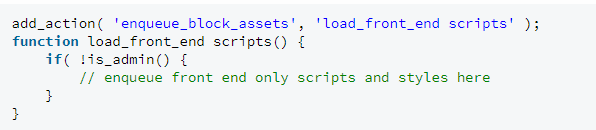
Now, imagine a scenario where you want to enqueue the script & style only on the front-end. So, what’s the solution to that? Actually, WordPress doesn’t provide the direct solution for this. However, you can have the solution for this by adding a conditional statement in the enqueue_block_assets function as shown in the snippet below:
To enqueue scripts and styles using the new hooks, you can use the standard WordPress functions: wp_enqueue_style() and wp_enqueue_scripts().
For the enqueueing scripts on the editor, remember to use the following dependencies:
a) scripts: array( ‘wp-blocks’, ‘wp-i18n’, ‘wp-element’, ‘wp-components’ )
b) styles: array( ‘wp-edit-blocks’ )
For the enqueueing scripts on the editor & front-end, remember to use the following dependencies:
c) array( ‘wp-blocks’ )
One very important thing you need to be aware of is that the actual files enqueued by our my-custom-block plugin are the compiled version of CSS & JavaScript. They’re not the files comprising of JSX & SaaS source code. So, don’t try to include raw source which includes React, ES6+ or SaaS. Otherwise, you will have to deal with many errors.
Registering Gutenberg Blocks
First of all, in order to create a new block in Gutenberg, you need to register the block. For that purpose, you can use registerBlockType() function and pass the block name as well as the configuration object in that.

In this function, there are two major parameters – block name & registerBlockType(). The first parameter block name is a string made up of two parts as shown in the snippet above. The namespace and the block name itself, which is separated by a forward slash.
If you want to register multiple blocks in one plugin, then you can use the same namespace. The namespace should be unique to plugins, as it prevents conflicts. The second parameter registerBlockType() is a settings object and it requires the number of properties to be specified which are as listed below:
1. title (string): displayed in the editor as the searchable block label
2. description (optional string): describes the purpose of a block
3. icon (optional Dashicon or JSX element): icon associated with a block
4. category (string): where the block appears in the Add blocks dialog
5. keywords (optional array): up to three keywords used in block searches
6. attributes (optional object): handles the dynamic block data
7. edit (function): a function that returns markup to be rendered in the editor
8. save (function): a function that returns markup to be rendered on the front end
9. useOnce (optional boolean): restrict block from being added more than once
10. supports (optional object): defines block-supported features
Here we’re assuming that we’re using JSX for block development. So taking that into consideration, the registerBlockType() function call should look as shown in the snippet below:

In this code, we have not considered the optional properties. We have just taken the properties which are mandatory. Now, let’s explore the various configuration object properties of registerBlockType() function in detail.
Title & Description
When you’re searching any block or inserting any block in Gutenberg, the title of your block will be displayed in the list of available blocks.

It is also shown in the block inspector window as shown in the screenshot above. Both the title as well as the description field should be wrapped inside i18n function for an easy translation to other languages.
Category
There are five block categories currently available in Gutenberg WordPress editor which are as shown in the screenshot below:

Common Blocks, Formatting, Layout Elements, Widgets, and Embeds are the five major categories of Blocks in Gutenberg. Currently, Gutenberg comes with fix categories, but in the future, there will be a few more categories with the evolvement of Gutenberg.
This property is most useful when you’re developing multiple blocks in a single plugin and you want them all to be listed under a specific category so that dealing with them becomes easier.
Icons

By default, your block is assigned the shield Dashicon. However, you can override this by specifying a custom Dashicon in the icon field. Each Dashicon is prefixed with dashicons- which is followed by a unique string.
For example, the gear icon has the name dashicons-admin-generic. So, if you want to use this as a block icon, then just remove the prefix i.e dashicons-. However, you can also use JSX element as a property of the icon. Remember that the default icon size is 20*20 pixels.
Keywords
You can choose up to three keywords which makes your block stand out from rest when the user search that. Always choose the keywords that help you to describe the functionality of your block in the best possible manner.

You can also keep your company name and/or plugin name as your primary keyword if you’ve multiple blocks. Although adding a keyword is optional, but it helps you to improve the UX.
Attributes
When you want to manage dynamic data in the block with the utmost ease, then you have to look towards the attributes. This is another optional property, as you don’t need it while using static inputs. Attributes stores the block data in post content saved in the database or in the meta.
Now to retrieve attribute data, we need to specify the location in the markup. For that purpose, you can make the use of CSS selector which points to attribute data. For example, if our block contained an anchor tag, we can use its title field as our attribute. This is shown below:

Here, the attribute name is ‘linktitle’ which is a random string. We can utilize this attribute to store the link title <a title=”some title”> which is entered via a textbox. So, when the post is saved, the attribute value will be assigned to the title field. Now, when the editor is loaded, the value of the title tag will be retrieved from the content.
There are also other ways of using the source to determine how the block is stored or retrieved via an attribute. For example, you can use the ‘text’ source to extract the inner text from a paragraph element.

You can also use the ‘text’ source to extract the inner text from a paragraph element as shown in the snippet below:

If you forget to specify a source, then the attribute value is saved in HTML comments which is part of a post markup. All these comments are stripped out before the post is rendered on front-end.
Edit
The edit function controls the block appearance inside the editor interface. Here, the dynamic data is passed to each block in terms of props which also includes the custom attributes.
It’s a standard practice to add className={ props.className } to main block element in order to get the output in a CSS class. WordPress doesn’t manage this thing, therefore you’ve to manually perform it. Using props.className is a common practice to tailor CSS styles for each block.
Last but not the least is that the edit function requires you to return valid markup via the render() method.
Save
Save is very similar to the edit function. It will show you how your block is going to look like on front-end. It also receives dynamic block data via props. One key difference between Save and Edit is that, props.className isn’t available in Save.
Supports
It accepts an object of boolean values and decides whether your block is good enough to support the core features or not. The available object properties for supports are as follows:
a. anchor (default false): allows you to link directly to a specific block
b. customClassName (true): adds a field in the block inspector to define a custom className for the block
c. className (true): adds a className to the block root element based on the block name
d. html (true): allows the block markup to be edited directly
The useOnce Property
When you want to restrict your block from being added more than once on a single page, then this property will be useful for you. A real-time example of this is More block which can’t be added to a page if it’s already present. The default value of useOnce property is false.
Let’s Create Something Fruitful.!
So far, we have gained the knowledge which is required for building a custom block in Gutenberg. Now, it’s time to put that knowledge into perspective and utilize the WordPress Development Services to create something new. In this section, we’ll build a custom block which obtains a random image via PlaceIMG web service.

Here, we will add the new custom block in my-custom-plugin rather than creating a new plugin from the scratch. You can get the code for default block in /src/block folder. Now, add another folder inside /src named random-image. Add 3 files inside that folder which are as below:
4) index.js: registers our new block
5) editor.scss: for editor styles
6) style.scss: styles for the editor and front end
We’re using the index.js file as the main block file which will help you to simplify statements inside block.js. Instead of including the full name & path of the block, you can now specify the path to the block folder and import will automatically manage an index.js file.
Now, open up the /src/blocks.js file and add a reference to the new block by using the code as shown in the snippet below:
![]()
The next step is to add the following code in a /src/random-image/index.js file to launch our new block as shown in the snippet below:

Once we add this code, the framework of the block will be established which is pretty similar to the boilerplate code generated by a create-guten-block toolkit. We start the whole process by importing the editor as well as the front-end styling. After that, we’ll extract some commonly used functions from wp.ii8n and wp.blocks.
In the registerBlockType() function, add the values for the various properties such as title, icon, category, and keywords. The Save and Edit functions are currently used to output static content. Now, add the random image block to a new page to see the output generated so far.

We have to make sure that we’re closely monitoring all the files for changes so that any block source code is well-compiled into JavaScript & CSS. If we’re importing the main block file into src/blocks.js, then we don’t need to do any additional work. JSX, ES6+, and SaaS code will be automatically compiled and stored into following files:
A) dist/blocks.style.build.css: styles for editor and front end
B) dist/blocks.build.js: JavaScript for editor only
C) dist/blocks.editor.build.css: styles for editor only
All the files mentioned above consists of JavaScripts & CSS code for the blocks and therefore, we just have to enqueue only one set of files.
Now, it’s time to add an attribute to our image block which will be stored in the image category. For that purpose, we will use the code as shown below in the snippet:

Once we execute this code, then it will create an attribute called category which will store the default value ‘nature’. Here, we haven’t specified a location to store the markup and that’s why special HTML comments will come into the equation.
The next step is to change the image category. For that, we need a drop-down control which will be done by updating the edit function as shown in the snippet below:

Once we implement this code, the output will be as shown in the screenshot below:

The edit function which we have used here is slightly different from the typical version. First of all, we have added a select drop-down control with several choices on the PlaceIMG website.

What happens in the edit function used here is that, whenever the value of drop-down changes the setCategory function is called which will help you to find the currently selected category and then calls the setAttributes function.
Now, in the future whenever a new category is selected, the value of an attribute is updated and passed back to the edit function which updates the output message as shown below:

Now, just the last step is remaining where we will fetch the random image and display it in the output. For that purpose, we will create a simple component which will take the current category as an input and will output an <img> tag which consists of a random image.
The request made to PlaceIMG website will be in the form of: https://placeimg.com/[width]/[height]/[category]. For example, if the category is ‘nature’, then the request URL will be: https://placeimg.com/320/220/nature.
It’s time now to add the ‘RandomImage’ component above ‘registerBlockType()’ as shown in the snippet below:

Now, to utilize this code, we will add it inside the edit function and remove the static output message. Also, we will follow the similar process for the save function.
So, finally the index.js file will look like as shown in the snippet below:

Now, we will add the following code to the editor.scss file which will add a color border around the image.
 Last but not the least is to add some styles in the style.css file. For that purpose, we will utilize the following coding snippet:

From now on, whenever the page is refreshed in the editor or from the front-end, a random image will be displayed as an output as shown in the screenshot below:


Wrapping Up Things…
Gutenberg is a new age WordPress editor which is going to have big say in the future. Therefore, it becomes vital for all the WordPress website owner to start preparing for it in advance.
Here, we have tried to provide you with an in-depth guide on how to create custom blocks in Gutenberg which will help you in the future.
If you’ve any questions or suggestions regarding this subject, then feel free to ask them in our comment section. Thank you!