What is meant by Authentication and Authorization?
Authentication and authorization are two important concepts in computer security that are often used in conjunction to ensure the security of an Angular development company’s sensitive data and resources.
Authentication is the process of verifying the identity of a user or system. It involves confirming that the user or system is who or what it claims to be. In other words, authentication is the act of confirming that someone is whom they say they are.
Authorization, on the other hand, is the process of granting or denying access to specific resources or actions based on the authenticated user’s identity and their associated permissions. The authorization ensures that users can only access the resources or perform the actions that they are authorized to do.
Authentication is an essential security measure in any web application. It involves verifying the identity of a user by comparing their provided credentials with a pre-defined set of user identities stored in the application’s system. The authentication process ensures that only authorized users can access protected resources and perform specific actions within the application.
Angular is a popular web development framework that offers robust support for implementing authentication mechanisms in web applications. One way to achieve this is by connecting Angular with Auth0, a popular authentication and authorization service. Auth0 offers a range of features, including secure login, user management, and social login options, that can be easily integrated into an Angular application.
How does Auth0 work in Angular?
To connect Angular with Auth0, developers need to first sign up for an Auth0 account and create an application. The application’s unique Client ID and Domain are then added to the Angular application’s environment variables. Developers can use the Auth0 SDK for Angular to handle user authentication and authorization, allowing users to securely log in, access protected resources, and perform authorized actions within the application.
Building an authentication and authorization system from scratch is very hard. In authentication, Auth0 is an Identity-as-a-Service (IDaaS) platform that allows you to centralize user authentication and API authorization for all applications and reduce that complexity.
Auth0 provides powerful security features. An authenticated login page, social login, Multi-Factor Authentication (MFA), and advanced user management allow you to go live at various times. And the most important feature is anomaly detection, which helps you prevent unauthorized users from accessing resources.
At Auth0, stuffing attacks while login, on average, nearly half of all login attempts using this platform.
Auth0 workflow:
- First integrate Auth0 with your Angular application.
- When your users need to log in, your Angular application triggers an authentication, which handles them to a customizable Auth0 login page.
- Once your user is logged in successfully, Auth0 redirects them back to your Angular application and returns tokens with their authentication and user information in this process.
- Then additionally, you can protect your APIs with Auth0 so that you can use an access token to make a request from the Angular application to the protected API.
Communication bridge between Angular and Auth0
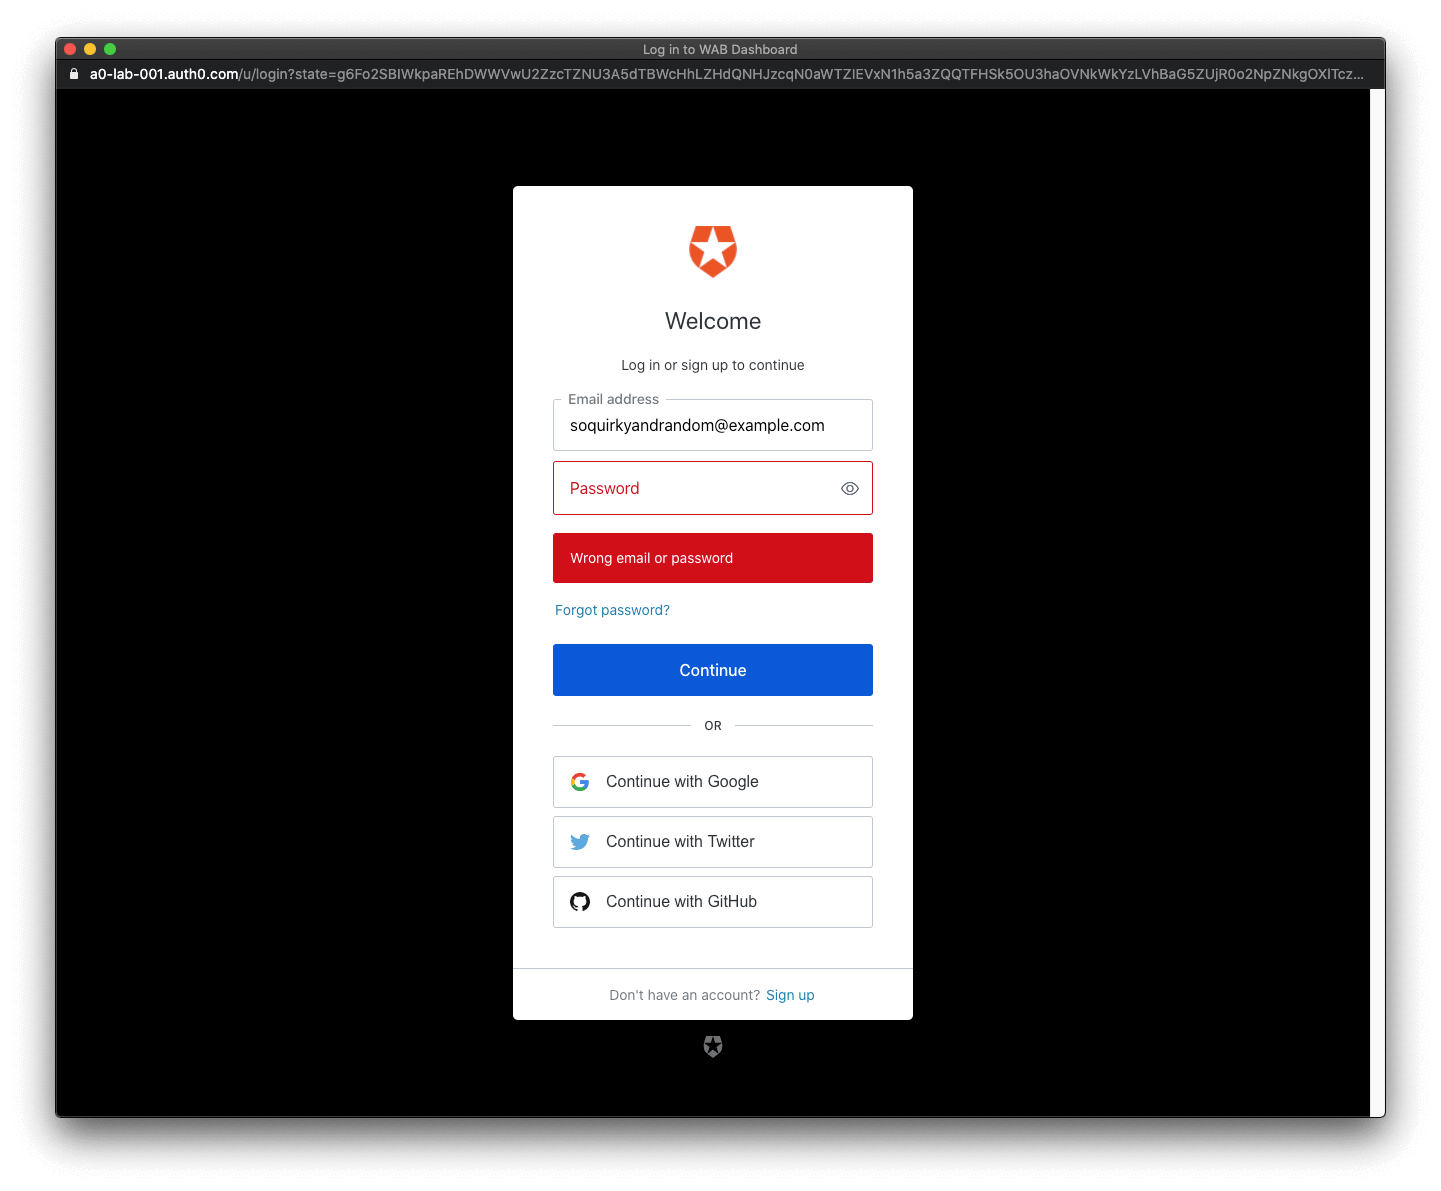
When you use the Auth0 authentication type with Angular, there’s no need to build a login user. Auth0 has a Universal Login page to reduce the lack of information adding and managing authentication.
It’s very important to highlight that the Auth0-provided form (Universal Login Auth0) reduces the username and password enumeration risk. Auth0 Universal Login that provides authentication error messages.
Source: Login demo of auth
Callback URL:
http://localhost:4040
Logout URL:
http://localhost:4040
Web Origins:
http://localhost:4040
Open the Angular application,and create an auth_config.json file under the project directory:
macOS/Linux:
touch auth_config.json
Windows Powershell:
ni auth_config.json
Populate auth_config.json as follows:
{
“domain”: “YOUR_AUTH0_DOMAIN”,
“clientId”: “YOUR_AUTH0_CLIENT_ID”
}
Add the Auth0 configuration variables to Angular application
In the Auth0 Application Settings page, the Auth0 Domain and Client ID values need to allow your Angular application to use the communication bridge of the auth an angular.
Open the Angular application project and create an auth_config.json file under the project directory:
macOS/Linux:
touch auth_config.json
Windows Powershell:
ni auth_config.json
Populate auth_config.json as follows:
{
“domain”: “YOUR_AUTH0_DOMAIN”,
“clientId”: “YOUR_AUTH0_CLIENT_ID”
}
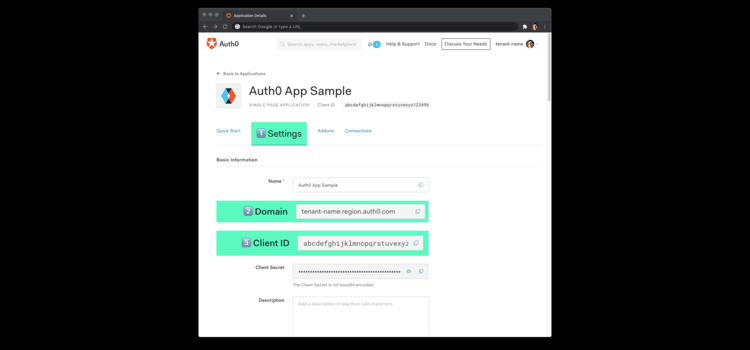
Head back to your Auth0 application page. Follow the below steps to get the domain and clientId values:
Source: Auth application
- Click on the “Settings” tab which is shown in the above image.
- then Use the “Domain” value from the “Settings” as the domain value in auth_config.json.
- Then Use the “Client ID” value from the “Settings” as the value of the clientid in auth_config.json.
change the content of src/environments/environment.ts:
// src/environments/environment.ts
import { domain, clientId } from ‘../../auth_config.json’;
export const environment = {
production: false,
auth: {
domain,
clientId,
redirectUri: window.location.origin,
},
};
Auth0 and Angular connection set
You have completed setting up an authentication service in your Angular application that can consume. one is left for you to continue building up the project to adding security components and features.
Auth0 helps save time on implementing and managing identity in the angular project.
Introduction of routing
Routing enables the user to navigate from one view to the next (within the same page) as users perform tasks such as:
Enter a URL in the address bar to navigate to a corresponding view.
- Then Click links on the page to navigate to a new page.
- Then Click the browser’s back and forward buttons to navigate backward and forward through the browser history.
Installation and Setup
Add the anglar router script
<script src =”router.dev.js”> </script>
import{
RouteConfig ,
ROUTER_PROVIDERS,
ROUTER_DIRECTIVES,
HashLocationStrategy,
LocationStrategy
};
import { NgModule } from ‘@angular/core’;
import { Routes, RouterModule } from ‘@angular/router’;
const routes: Routes = [ ];
@NgModule({
imports: [RouterModule.forRoot(routes)],
exports: [RouterModule]
})
export class AppRoutingModule { }
Routing between App and First Components
❑Create new component
❑Suppose you want to add routing from app.component to your first-component then add following code in your app.component.html file
<router-outlet></router-outlet>
<router-outlet> is a router directive that is used for directing the router to display the routed views of the angular application. To use this directive, you need to import it in app.module.ts file from the angular router directory using the below command:
import { Routes, RouterModule } from ‘@angular/router’;
❑Add module in the imports:[ ] section placed in the app.module.ts file.
imports: [
BrowserModule,
AppRoutingModule,
BrowserAnimationsModule,
MatToolbarModule,
RouterModule.forRoot(routes)
],
Routing between App and First Components
❑Add module in the imports:[ ] section located in the app.module.ts file.
imports: [
BrowserModule,
AppRoutingModule,
BrowserAnimationsModule,
MatToolbarModule,
RouterModule.forRoot(routes)
]
❑Create a path for first-component in Routes=[ ] section in app.module.ts file
const routes: Routes = [
{ path: ‘first-component’, component: FirstComponentComponent }
];
Component-to-Component Routing
❑Suppose you want to navigate from component-to-component
❑Then add a router link on your first-component.component.html file to your second-component.component.html file
<a routerLink = “/second-component”>
Second Component
</a>
or
<a [routerLink] = “’/second-component’”>
Second Component
</a>
Routing through Buttons
❑Suppose you want to navigate through buttons then
1.<button class=”example” mat-icon-button routerLink=”/” type=”button”> home </button>
2.<button mat-menu-item routerLink=”/settings” type=”button”>Settings</button>
Special String Path
❑There is also a special string ‘**’ that can be added to the path.
❑string is used to redirect to your path if the requested URL doesn’t match any of your defined paths or routes.
❑string can be added in your Routes=[ ] section which is located in the app.module.ts file.
const routes: Routes = [
{ path: ‘first-component’,
component: FirstComponentComponent },
{ path: ‘second-component’,
component: SecondComponentComponent },
{ path: ‘settings’, component: SettingsComponent },
{ path: ‘help’, component: HelpComponent },
{ path: ‘**’, redirectTo: ”, pathMatch: ‘full’ }
];
Conclusion
In summary, authentication and authorization work together to ensure that only authorized users can access sensitive information and resources in a secure manner. Authentication confirms the user’s identity, while authorization determines what they are authorized to access or do based on their identity and permissions.
Connecting Angular with Auth0 offers a powerful way to implement robust authentication and authorization mechanisms in web applications, ensuring that only authorized users can access protected resources and perform specific actions within the application. Hope this blog helped you learn vital things about security.
Author Bio: Vinod Satapara – Technical Director, iFour Technolab Pvt. Ltd.
Technocrat and entrepreneur with years of experience building large-scale enterprise web, cloud, and mobile applications using the latest technologies like Angular, ASP.NET, CORE, .NET MVC, and Blockchain. Keen interest in addressing business problems using the latest technologies and have been associated with an esteemed Excel Addin Development Company – iFour Technolab Pvt. Ltd.


